AWS has a bunch of software tools to allow developers to store, build and deploy code. Being a DevOps engineer I wanted to explore how these tools could be used to deploy an infrastructure as code project.
The AWS Developer Tools (CodeCommit, CodePipeline, CodeBuild and CodeDeploy) are obviously designed to work well with CloudFormation, but I wanted to explore how one would go about deploying Terraform instead.
My rough plan was to setup a Terraform project in GitHub (not CodeCommit, as all our other code was already in GitHub. I also wanted the challenge of getting the code from an external repo) and then attempt to deploy that using the AWS developer tools.
Along my journey, I wanted to use the latest versions of everything in order to keep this write up relevant for as long as possible and I also wanted to use the opportunity as a learning exercise. So I decided to take my first foray into Terraform v0.12.
To start with, I created this simple Terraform project that just implements a hello world Lambda in Python, along with the required IAM role, policy and permissions. I decided to set up environment vars files for my specific deployment and stored the state in S3. So that means executing my Terraform would need to be done in a specific way. Your mileage may vary. I tested it to make sure it behaved as expected, by running it locally from my laptop.
An execution plan has been generated and is shown below. Resource actions are indicated with the following symbols:
+ create
Terraform will perform the following actions:
# aws_iam_policy.lambda will be created + resource "aws_iam_policy" "lambda" { + arn = (known after apply) + id = (known after apply) + name = "example-dev-hello-world-lambda-eu-west-1" + path = "/" + policy = jsonencode( { + Statement = [ + { + Action = [ + "logs:PutLogEvents", + "logs:CreateLogStream", + "logs:CreateLogGroup", ] + Effect = "Allow" + Resource = "arn:aws:logs:eu-west-1:xxxxxxxx:*" + Sid = "HelloWorldLambdaPolicy" }, ] + Version = "2012-10-17" } ) }
# aws_iam_role.lambda will be created + resource "aws_iam_role" "lambda" { + arn = (known after apply) + assume_role_policy = jsonencode( { + Statement = [ + { + Action = "sts:AssumeRole" + Effect = "Allow" + Principal = { + Service = "lambda.amazonaws.com" } + Sid = "HelloWorldLambdaTrustPolicy" }, ] + Version = "2012-10-17 } ) + create_date = (known after apply) + force_detach_policies = false + id = (known after apply) + max_session_duration = 360 + name = "example-dev-hello-world-lambda-eu-west-1" + path = "/" + unique_id = (known after apply) }
# aws_iam_role_policy_attachment.lambda will be created + resource "aws_iam_role_policy_attachment" "lambda" { + id = (known after apply) + policy_arn = (known after apply) + role = "example-dev-hello-world-lambda-eu-west-1" }
# aws_lambda_function.lambda will be created + resource "aws_lambda_function" "lambda" { + arn = (known after apply) + description = "Hello World Lambda function" + filename = "./lambda/hello_world.zip" + function_name = "hello_world" + handler = "hello_world.lambda_handler" + id = (known after apply) + invoke_arn = (known after apply) + last_modified = (known after apply) + memory_size = 128 + publish = false + qualified_arn = (known after apply) + reserved_concurrent_executions = -1 + role = (known after apply) + runtime = "python3.6" + source_code_hash = "HPbB8ZGMMP84awMSLPR7e64VzJ0+zyXdBec2ex+LXAA=" + source_code_size = (known after apply) + timeout = 3 + version = (known after apply) + tracing_config { + mode = (known after apply) } }
Plan: 4 to add, 0 to change, 0 to destroy.
The next step was to create a CodeBuild buildspec file in the root of the repo that will be used to instruct CodeBuild later:
Install: This is where we download and install Terraform on the image that CodeBuild uses to do its work. Due to wanting to use the latest Ubuntu standard image (version 2.0) that is available with CodeBuild, I had to specify a run-time section as version 2.0 mandates that a runtime-versions section must exist in the buildspec. I just chose python but it isn’t actually used for anything here. CodeBuild also allows to use your own custom images, so you could create your own Docker image with Terraform already baked in, hosted in ECR or elsewhere.
Build: In a traditional code building process, this is where you would…well…build the software 🙂 But as we are trying to deploy Terraform here, this is where we will run our Terraform commands in order to deploy our Lambda. So effectively this is the deploy. Hence why we don’t need to use AWS CodeDeploy.
Post_build: I didn’t really need this section, but I just stuck a completion message in there just for the sake of having something in there.
CodeBuild makes environment variables available for you to use. You can see in buildspec,yaml I used $CODEBUILD_SRC_DIR to cd into the root of the source code directory. I also used some custom environment variables such as ${TF_VERSION} that I later setup in the CodeBuild project.
Next I had to create a CodeBuild project that would checkout the Terraform/Lambda project and execute what’s in the its buildspec.yaml file and a CodePipeline pipeline that triggers the CodeBuild job upon detecting changes in the repo.
After going through the AWS documentation I managed to create a CodeBuild project with a GitHub OAuth token and some environment variables specifying things like the Terraform version to use when executing the hello-world project. In order to keep the GitHub token secure, I added it as a parameter in AWS SSM Parameter Store so it could be pulled out from there.
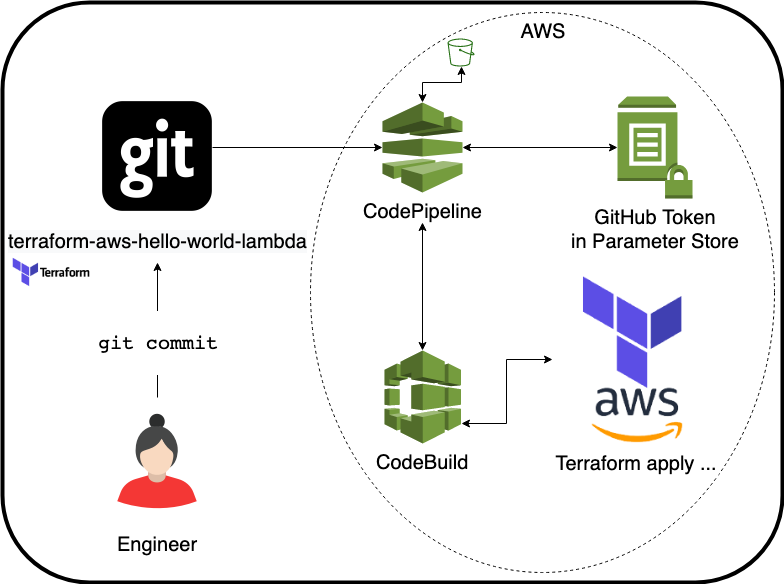
I then looked at how I could automate the building of such a project, which I achieved with Terraform. After which I cleaned everything up and actually ended up creating a reusable Terraform module. The diagram below depicts the components created by the module, including the IAM resources required:
codebuild_env_vars = [ { name = "TF_VERSION" value = "0.11.14" }, { name = "TF_ENV" value = "account1_env_vars_file" }, { name = "TF_ACTION" value = "apply" }, { name = "TF_IN_AUTOMATION" value = "1" }, { name = "TF_LOG" value = "DEBUG" # Available options: TRACE, DEBUG, INFO, WARN or ERROR } ] }
It basically just requires some details about the source repository, some IAM policies and allows you to set some environment variables for use in your buildspec file. The IAM policies of course could be existing AWS ones or be created elsewhere e.g. in the Terraform calling the module. Suffice to say, they should be locked down as much as possible to follow least privilege principles.
The module isn’t as polished and flexible as it could be. You may want to adapt and fine-tune it to meet your particular needs. For example, I would probably want a manual approval step before deployment to a production environment, so you could perhaps integrate SNS for this purpose. I just decided to make what I had at the time into a reusable module because it was simple enough to do…pull requests, are of course, welcome.
As mentioned earlier, I had no use for CodeDeploy, as the build process basically does our deployment for us. So there are no references to CodeDeploy in the Terraform.
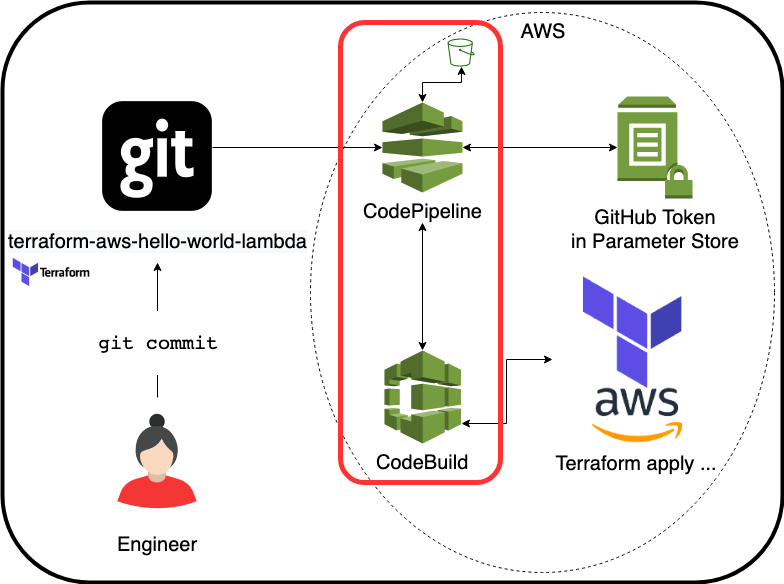
So what we end up with here is a Terraform module that allows you to spin up a CodePipeline pipeline that triggers CodeBuild to run Terraform when something is committed to master in a given git project (our hello-world Lambda Terraform repo).
Here is an example project I setup that uses this module to deploy the hello-world Lambda Terraform project.
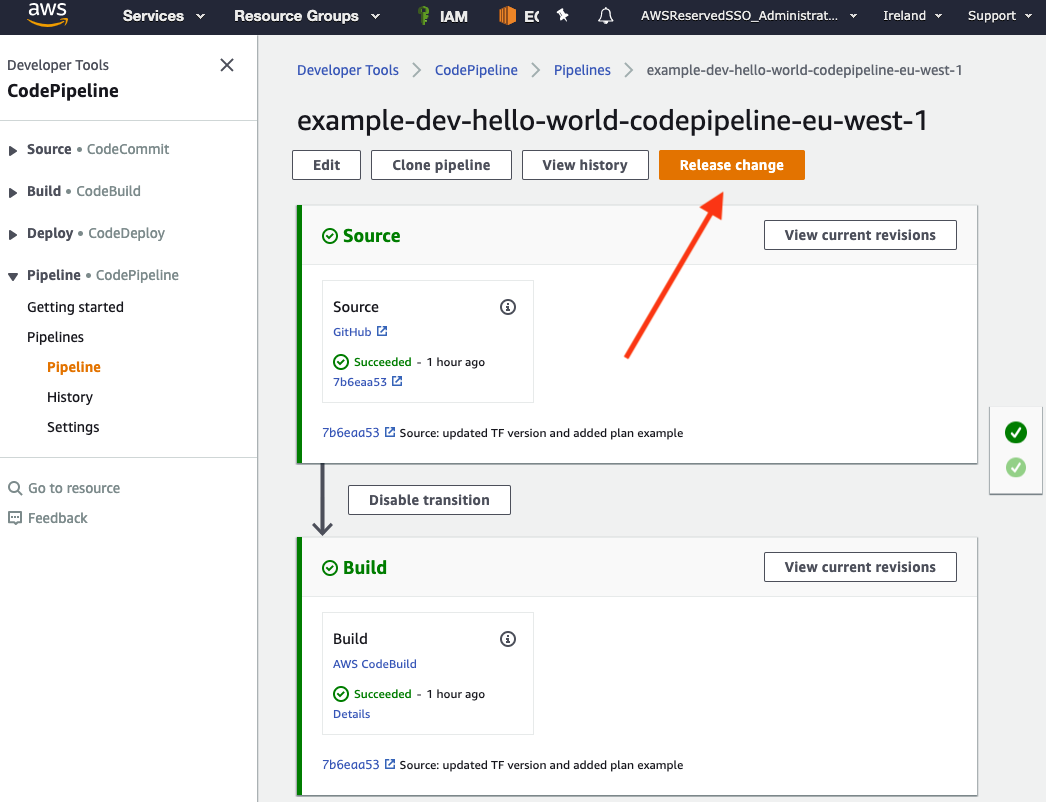
In order to run builds manually you can simply click the Release Change button in the Pipeline:
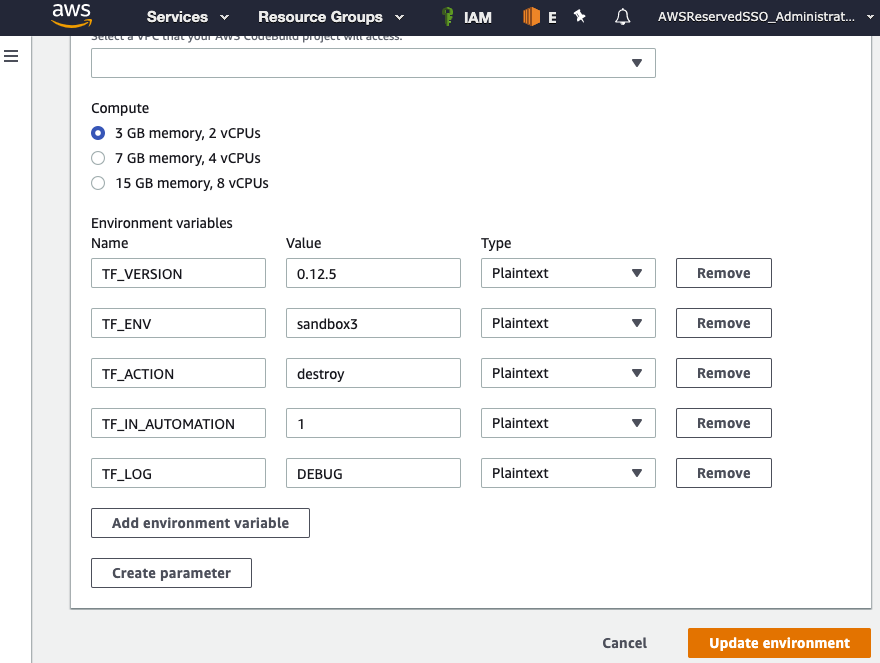
If you have some issues in the Terraform deployment, you can set the TF_LOG environment variable as required in CodeBuild which will enable you to see enhanced log messages from Terraform. This can either be done in Terraform (see module README or the example project) or the AWS console (CodeBuild -> Build Projects -> Project -> Edit -> Environment -> Additional Configuration):
Below is an example of the logs shown during a deployment:
What about Terraform destroy?
An issue I found I had when looking to tear everything down was that the Lambda Terraform project was not destroyed when destroying the parent Terraform project (that sets up CodePipeline/CodeBuild). So in order to have the ability to destroy a target project, I used another environment variable for the Terraform action to perform (apply or destroy). Again, as this was just an experiment, it was the easy option. I’m sure there are more elegant solutions available. I did consider creating 2 pipelines per project with one being for destroying it, but it just didn’t seem like a sensible solution.
So in order to destroy everything, I set the CodeBuild environment variable $TF_ACTION to be destroy and then ran the pipeline, which deleted the Lambda and all the IAM resources associated with it. And then from my laptop I ran terraform destroy on the example project to destroy all the CodeBuild/CodePipeline resources.
What about rollback?
Currently, there is no provision in CodePipeline to roll back or release a previous version. There is in CodeDeploy, but we have not used that service here. Terraform itself doesn’t actually do roll-backs as a design feature. It stores the current state of the environment in state files. So the fix would be to roll forward if a successful terraform plan was to fail on terraform apply.
What’s missing?
Testing. I have not included any tests with my code, but they could be added as another stage in CodePipeline. You may have to install any software you use for testing (e.g. Terratest) on the image CodeBuild uses.
Closing comments
In conclusion, I’ve managed to achieve my aim, but the final solution didn’t feel very slick (well, not in the way I decided to utilise the services anyway). The AWS developer tools are capable, and flexible enough to cater for a variety of deployment types but probably better suited to traditional software builds and deployments.
Without CodeDeploy in the mix, visually, the tools don’t offer a good snapshot view of the environment. E.g. traditionally I would want to tag something in Git and then view in my CI/CD tool where that tag was deployed, or see what version my production environment is currently on etc. That isn’t really possible with just CodePipeline/CodeBuild here.
If you are restricted to using only AWS tools for Terraform deployment, then hopefully this article has highlighted some possibilities. The costs for using the CodeBuild and CodePipeline are very cheap, and may work out much less than perhaps spinning up an EC2 instance running your CI/CD tool of choice. And they do integrate well with the other AWS services. These being serverless services is great and not having to worry about networking is always a plus (unless of course you are running in very secure AWS environments and require the use of proxies to access the internet).
So it is possible. But as of today, I would probably use something else for automated deployments for Terraform. If and when the AWS developer tools mature a little, then perhaps I will revisit this then.