Overview
So here’s the thing; everyone knows about running a GitOps flow these days.
Devised by Weaveworks a while back, it’s a simple, efficient and extremely effective way to get your code from keyboard to production in the shortest time with, ideally, zero intervention. We recently worked with Weaveworks and they’re smart people.
If you want to read more on it then the best place to go is to the source here
The thing is that while these types of hands-off workflows are extremely common, very often different vendor tools are used in each part of the process: A code repository, typically git in some shape (licensed or open source), an artefact build service and a deployment service (Jenkins, Circle Ci etc.) then a storage facility of some kind (Nexus, Artifactory, Sonatype Nexus).
I’m quite sure that everyone is aware that all these actions can be performed using native AWS tooling, but not everyone is inclined to do so, therefore in this article I’m going to show you how easy it is to do.
Let’s look at a high level overview of how to create a Docker container from code to storage using AWS services starting with the storage area…
ECR
ECR is a container storage registry backed by S3 that provides all the high availability and storage you’d expect with S3 as well as the low cost of the storage. It offers IAM control over the registry allowing fine-grained access to actions and repositories and can accept Docker CLI commands to push images.
ECR also offers a scanning service for images, this service can be set to ‘scan on push’ meaning any image that it accepts will be scanned for CVE’s with each vulnerability rated according to NVD Severity Ratings.
ECR also allows services such as ECS to pull directly to start applications.
Repositories can be created from the console or from the CLI and one created will be used to receive and serve images:
aws ecr create-repository --repository-name DockerDemo/docker-image
CodeCommit
Git is incredibly popular for all the right reasons, it’s incredibly versatile, easy to pick up and start to use but is very deep and complicated and makes doing things that are really quite complex seem easy. The good thing here is that you don’t need to move away from git, in fact git is the basis for AWS CodeCommit.
All the usual things are available that you’d expect with git, branching, pull requests, branch protection etc but there are also the some neat AWS features available like the ability to weave in IAM so you can only allow certain roles to push to certain branches, which is a nice kick. CodeCommit is also S3-backed so all the features that make S3 great like high availability and enormous space are available here. There is also AWS CodeGuru, in preview at the time of writing, which only supports Java right now but it can perform code analysis on what’s in the repo and there’s going to be support for more languages coming soon.
To start to use CodeCommit you’ll need to have the correct IAM policy attributes and the relevant IAM roles in place to allow access but once the repository is created, within the console or on the CLI using:
aws codecommit create-repository --repository-name DockerDemo --repository-description “Docker Demo" --tags Team=DockerDemo
As you can see it’s possible to add tags to repos which can be useful identifying them at a later date as it is with most AWS resources
Additional credentials will need to be created for git usage depending on which type of user you are going to authenticate with and a full guide for this is found in the AWS docs here.
With the authentication and repository created, it is over to the standard git commands to clone the repo
git clone https://git-codecommit.us-east-1.amazonaws.com/v1/repos/DockerDemo DockerDemo
and perform the normal actions you would like adding a basic file for creating a Docker image.
echo “FROM golang:1.12-alpine AS build
#Install git
RUN apk add --no-cache git
#Get the hello world package from a GitHub repository
RUN go get github.com/golang/example/hello
WORKDIR /go/src/github.com/golang/example/hello
# Build the project and send the output to /bin/HelloWorld
RUN go build -o /bin/HelloWorld

FROM golang:1.12-alpine
#Copy the build's output binary from the previous build container
COPY --from=build /bin/HelloWorld /bin/HelloWorld
ENTRYPOINT ["/bin/HelloWorld"] > dockerfile

Add this file to your repo
git add Dockerfile
git commit -am “Adding Dockerfile”; git push
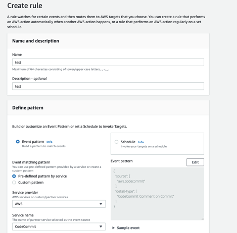
Git has the power to harness hooks to perform actions on both the client and server side, in this case we can perform server-side actions by utilising Amazon EventBridge (previously CloudWatch Events). These events will listen for commits to the repository and will perform the required actions when triggered.
CodeCommit triggers can be created either on the CLI or in the console and can point to any number of services in AWS, for example AWS CodeBuild.
CodeBuild
CodeBuild is a mechanism to create artefacts that behaves in much the same way as Jenkins, it fact it’s possible to integrate CodeBuild with an on-premise Jerkins as a slave to utilise the systems you have in your AWS VPCs. Once the code build has completed we can use the post-install sections of the build spec to push to our container repository or we can trigger a pipeline job that can do more with our artefact – deploy it to EKS for instance..
Let’s create a basic CodeBuild job to get our container ready to be pushed to ECR.
version: 0.2

phases:
  pre_build:
    commands:
      - echo Logging in to Amazon ECR...
      - $(aws ecr get-login --no-include-email --region $AWS_DEFAULT_REGION)
  build:
    commands:
      - echo Build started on `date`
      - ‘build commands’
      - docker push
  post_build:
    commands:
      - echo Build completed on `date`
Once the job is complete and the image uploaded, it can be automatically pulled from ECR and used to run in ECS or it can be pushed on a step further using CodePipeline. By using EventBridge rules there are a number of options